Basic Doodle Shapes: Build Any Doodle From Lines, Circles and Boxes
Six simple marks are behind nearly every doodle. Learn to name an object's biggest shape first, follow three stroke-by-stroke build-ups and try a five-minute routine that turns one shape into five objects.
Doodle at a glance
What you need
- Any pen, such as a fineliner, gel pen or ballpoint
- Plain or dot-grid paper
- Pencil and eraser, only if you want guide lines
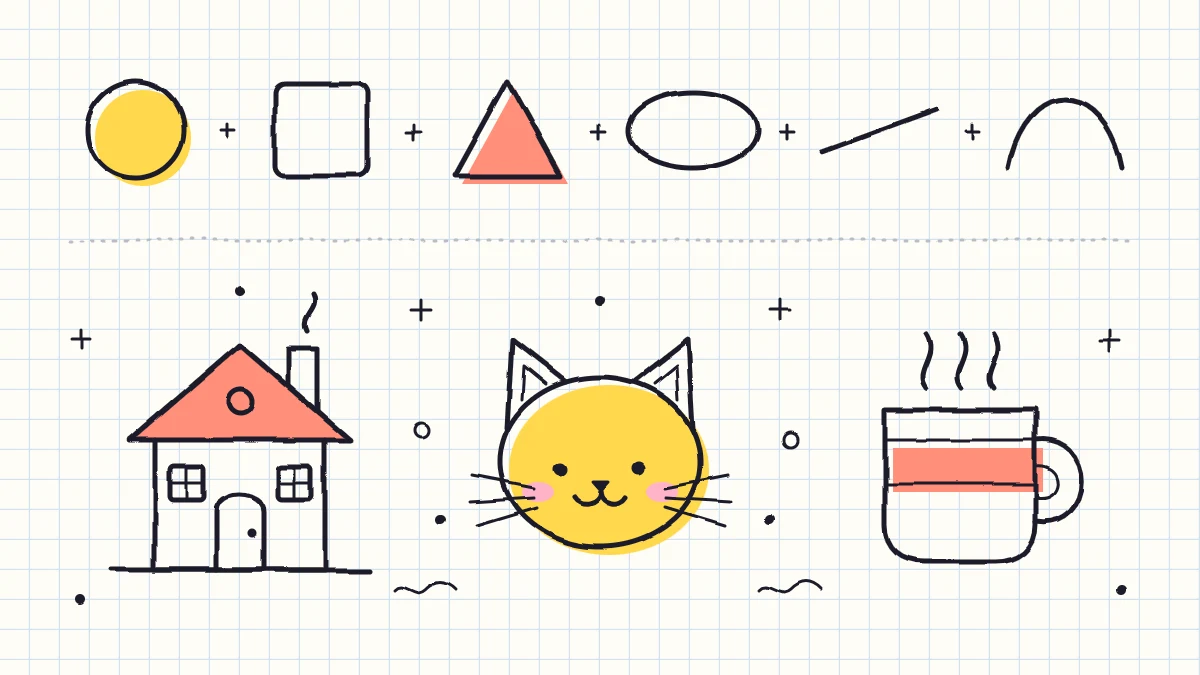
Copying a finished doodle teaches you that one doodle. Learning the basic doodle shapes underneath it teaches you all of them, because nearly every small drawing is the same handful of marks put together in a different order.
The method is short: name the biggest shape, add the second shape, finish with one or two details. Below are the six building blocks, three build-ups to follow stroke by stroke, and a small routine that turns the method into a habit.
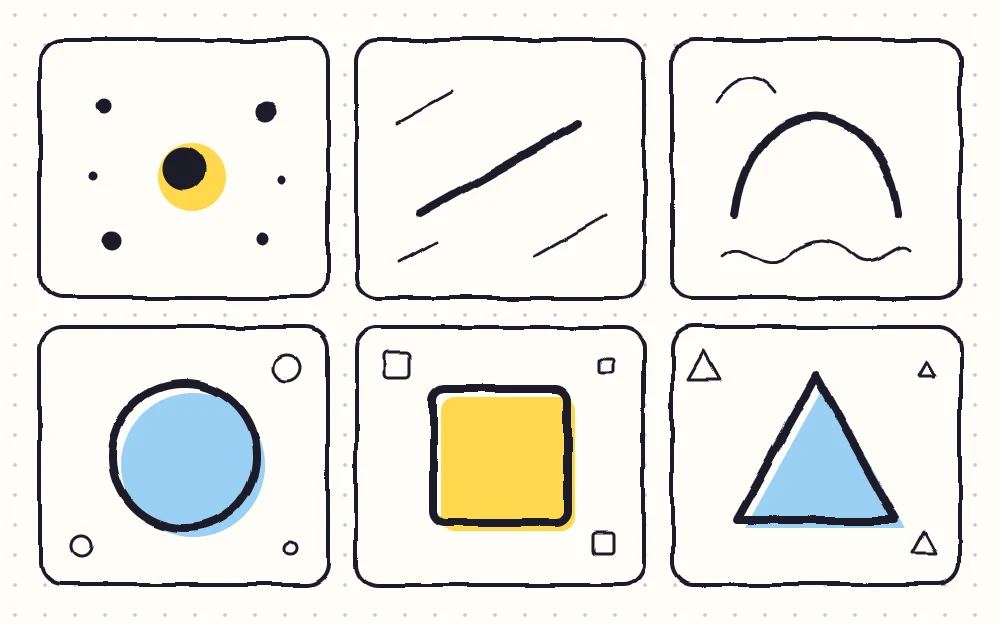
The Six Building Blocks
You already make all of these when you write. Draw each one a few times, small, before going further.
- Dot: eyes, seeds, sprinkles, and filler between larger doodles.
- Straight line: stems, strings, rays, legs, the edges of boxes.
- Curve: smiles, handles, petals, waves, steam.
- Circle: heads, fruit, balloons, wheels, suns. Stretch it and you have an oval.
- Square: houses, books, gifts, windows. Stretch it and you have a rectangle.
- Triangle: roofs, trees, flags, ears, beaks, slices of pizza.
If the general idea of doodling is new to you, the relaxed overview of how to doodle explains why small and simple is the whole point.
Name the Biggest Shape First
Pick any object near you and ask one question: which of the six blocks takes up most of it? Ignore the details completely for a moment.
- A clock is a circle.
- A book is a rectangle.
- A party hat is a triangle.
- A lollipop is a circle sitting on a straight line.
- A house is a square with a triangle on top.
Then work in this order every time:
- Biggest shape. Draw it first, at the size you want the finished doodle to be.
- Second shape. Attach the next largest part: a handle, a lid, a roof, a trunk.
- One or two details. Add only what tells the viewer what the thing is. A circle with a string is a balloon. The same circle with two hands in the middle is a clock.
Stopping at two details is the hard part. A doodle with six details starts to look fussy, and it stops being quick.
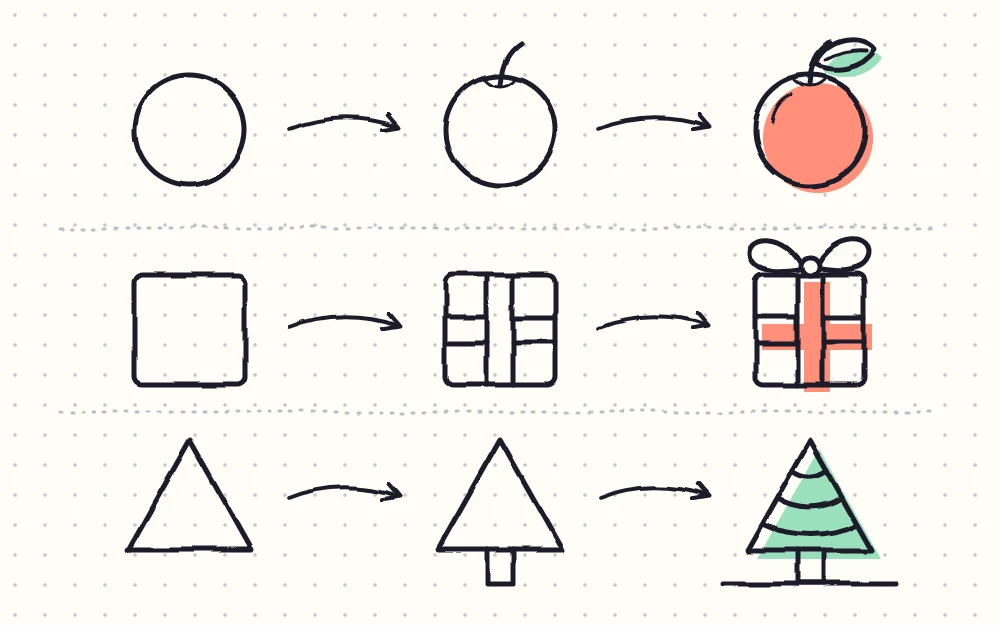
Three Worked Build-Ups
Draw each of these about the size of a large coin. Use a pen, and do not worry about lines that fail to meet perfectly.
Circle to apple
- Draw a circle, a little wider than it is tall.
- At the top center, just inside the outline, draw a short curve shaped like a shallow smile. This is the dip where the stem sits.
- From the middle of that dip, draw a short line going up and leaning slightly to one side. That is the stem.
- Beside the stem, add a leaf: two curves that start at the same point and meet again in a tip.
Square to gift box
- Draw a square.
- Draw two close parallel lines down the middle, from the top edge to the bottom edge. This is the ribbon.
- Draw two more parallel lines across the middle from side to side, so the ribbons cross.
- On the top edge, above the vertical ribbon, draw two small loops leaning away from each other, like a rounded letter V. Add a tiny circle where they join for the knot.
Triangle to pine tree
- Draw a tall triangle with a flat base.
- Under the middle of the base, draw a short, narrow rectangle for the trunk.
- Inside the triangle, draw two or three shallow curves from one side to the other, sagging in the middle like hanging strings. They suggest layers of branches.
- Add a short line under the trunk for the ground.
Practice Routine: One Shape, Five Objects
This takes about five minutes and works on any scrap of paper. Choose one shape, draw it five times in a row, then turn each copy into a different object.
With five circles, for example:
- Balloon: add a tiny triangle at the bottom and a wavy string below it.
- Sun: add eight short lines around the outside, like the points of a compass.
- Cookie: scatter five or six dots inside and take a bite out of the edge with two small bumps.
- Clock: draw one short line and one longer line from the center.
- Bear: add two half-circle ears on top, two dot eyes and a small oval nose.
That last one is worth noticing. A circle plus ears is the start of almost every animal, which is how the set of cute animal doodles builds a dozen creatures from the same rounded body.
Tomorrow, do the same with five squares: a window, a book, an envelope, a robot head, a slice of toast. The day after, triangles. Three short sessions give you fifteen doodles you can draw from memory.
Tip
Stuck for an object? Look for the shape first, not the thing. Scan the room for anything round, then anything boxy. The ideas come from what you spot.
Rounded Corners and Wobbly Lines
Doodle shapes are not geometry. A square with soft, rounded corners looks friendlier than one with sharp points. A circle that does not quite close, or a triangle with one side slightly bowed, looks hand-drawn in a good way.
So do not reach for a ruler. Draw each shape in one or two confident strokes and accept what you get. If your lines feel scratchy or hesitant, a few minutes of line practice warm-ups will loosen your hand without making it stiff.
Where the Shapes Take You
Once you see blocks instead of objects, any subject becomes a small puzzle: which shape is biggest, what attaches to it, and which single detail gives it away. A mug is a rectangle, a C-shaped curve and a wisp of steam. A fish is an oval, a triangle tail and a dot.
The same thinking, tidied up, gives you clean little symbols for planners and notes. The guide to simple line icons starts from a square frame and fits one main shape inside it, which is this method with a few extra rules about size and line weight.
Frequently asked questions
What are the basic shapes used in doodling?
Six marks cover nearly everything: a dot, a straight line, a curve, a circle, a square and a triangle. Ovals and rectangles are just stretched circles and squares. Most doodles combine two or three of these and then add one or two small details that make the object recognizable.
How do I turn a real object into a simple doodle?
Ask which single shape takes up most of the object and draw that first. Attach the second largest part, such as a handle, lid or roof. Then add only one or two details that identify it and leave everything else out. Stopping early keeps the doodle clear and quick.
Do my circles and squares need to be neat?
No. Rounded corners, slightly uneven sides and circles that do not quite close are part of the hand-drawn look. Draw each shape in one or two quick strokes without a ruler. Neat enough to recognize is all a doodle needs, and repetition tidies the shapes up over time.