Simple Line Icons: How to Doodle Everyday Symbols
Draw your own clean outline symbols for notes and planners. A pencil-frame method keeps every icon the same size, a house shows the steps, and a starter set of ten gives you symbols to use right away.

Doodle at a glance
What you need
- Black fineliner or gel pen, around 0.4 mm
- Pencil and eraser for the square frames
- Dot-grid or squared paper
- One highlighter for an accent color
Small outline symbols make a page of notes easier to scan: a bell beside a reminder, an envelope next to “reply to Sam,” a pin by an address. You do not need a stencil or a sticker sheet for that. Simple line icons are some of the quickest doodles to draw yourself, because they follow a few fixed rules.
Below are those rules, a pencil-frame method that keeps every icon the same size, a house drawn stroke by stroke and a starter set of ten everyday symbols.
What Makes a Doodle Read as an Icon
An ordinary doodle can be loose and leaning. An icon is the tidier cousin. Four things give it that clean look:
- One line weight. Use a single pen for the whole icon, and for the whole set.
- A simple outline. The outer shape alone should nearly tell you what the object is.
- Very few inside details. Three at most. Fewer is usually better.
- The same size every time. A row of icons looks like a set only when they match in height and width.
Icons also face the viewer straight on. No tilted angles, no depth, no shadows.
The Square-Frame Method
This is the whole technique, and it takes about a minute per icon.
- Pencil a small square. Make it roughly as wide as your thumbnail. On dot-grid or squared paper, count three or four spaces each way. Keep the line very light, because it is a guide line.
- Fit the main shape inside. Let it nearly touch the frame on at least two sides so it fills the space.
- Add up to three details. Pick the ones that identify the object and skip the rest.
- Ink it. Go over the icon in pen with steady single strokes.
- Erase the frame once the ink is dry. Or ink the frame too, with rounded corners, for a tile look.
Fitting a main shape into a frame is easier when you can spot that shape quickly. If that part feels slow, the guide to basic doodle shapes is the place to practice it.
Worked Example: A House
- Pencil the square frame.
- In the lower half, draw a slightly smaller square for the walls, sitting on the bottom of the frame with a small gap on each side.
- Draw the roof as a wide, upside-down V. Its peak touches the top center of the frame, and its two ends reach a little past the walls on both sides.
- Add the door: a small upright rectangle standing on the floor line, left of center.
- Add one window: a small square to the right of the door, about halfway up the wall.
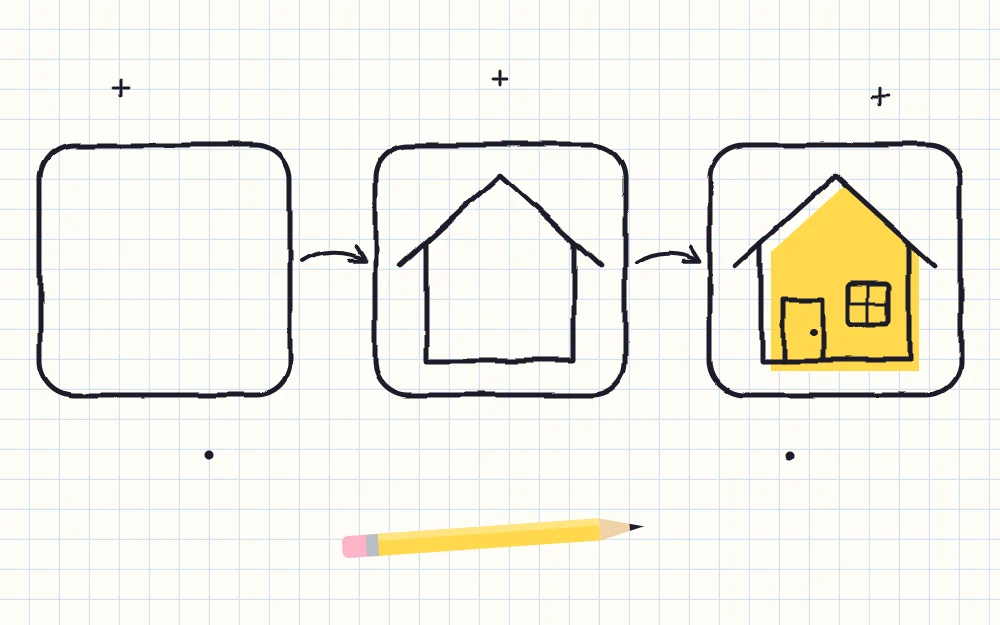
Two details are enough. Curtains, a path and a doorknob would turn it back into a drawing.
A Starter Set of Ten Icons
The house is the first. Here are nine more, each drawn inside the same frame.
- Envelope: a rectangle wider than tall. Draw a line from each top corner down to meet in the center, forming a V.
- Clock: a circle that fills the frame. From the center, draw a short hand pointing up and a longer hand pointing right. Add a tiny tick mark at the top, bottom and both sides.
- Magnifying glass: a circle in the upper left of the frame. From its lower right edge, draw a short, thick line slanting to the frame’s corner for the handle.
- Light bulb: a circle left open at the bottom. Bring both ends straight down a short way, close them with a small box and draw two lines across the box.
- Heart: start at the center dip, curve up and around to one side and down to the bottom point. Mirror it on the other side.
- Camera: a rectangle with rounded corners. Put a circle in the middle for the lens, a small flat box on the top left for the button and a dot in the top right corner.
- Bell: an upside-down U that flares outward at the bottom. Close it with a flat line slightly wider than the opening, then add a small half circle hanging under the middle.
- Pin: an upside-down teardrop, round at the top and narrowing to a point at the bottom. Draw a small circle inside the round part.
- Cloud: a flat base line with three bumps above it, the middle one tallest.
All ten are generic objects, and that matters. Skip company logos and app symbols and draw the plain thing itself. For more subjects, look around the room: the collection of household object doodles reduces twenty everyday items to a main shape and one detail, which is exactly what an icon needs.
Tip
Test an icon by covering its inside details with a fingertip. If the outline alone still suggests the object, the icon works. If not, change the outline before adding anything inside.
Three Ways to Finish an Icon
Once the outline is inked, you can leave it or dress it up. Choose one finish and use it on the whole set.
- Plain outline. Nothing added. The cleanest look, and the fastest.
- Offset color. With a highlighter, dab a flat shape roughly the size of the icon, shifted a little down and to one side so it does not line up with the outline. One accent color for every icon ties the set together.
- Bold outer line. Go around the outside edge only with a thicker pen, leaving the inside details thin.

Let the ink dry before adding highlighter, since gel and felt-tip ink can smear.
Keeping a Set Consistent
A single icon is easy. Ten that look related take a little care:
- Pencil all the frames first, in a row, before drawing any icon.
- Use the same pen from the first icon to the last.
- Round every corner, or keep every corner sharp. Do not mix the two.
Where to Use Your Icons
Icons do their best work next to words. Put a bell beside a deadline, an envelope beside “send,” a light bulb beside an idea, a pin beside a place and a clock beside a time. Draw them at the start of the line, where a bullet point would go.
A small key in the corner of a planner page helps too: draw each icon once with its meaning written beside it, then use the same symbols all week. For more ways to dress up a page without crowding the writing, see these notebook doodle ideas.
Frequently asked questions
How do I keep my hand-drawn icons the same size?
Pencil a row of identical small squares before you draw anything, then fit each icon inside its own square so it nearly touches at least two sides. Dot-grid or squared paper makes this easy because you can count the same number of spaces for every frame.
How many details should a line icon have?
No more than three inside the outline, and often one or two is better. The outer shape should do most of the work. A house needs only a door and a window, and an envelope needs only the V of its flap. Extra detail makes a small icon harder to read.
What pen is good for drawing icons?
A fineliner or gel pen with a tip around 0.3 to 0.5 mm gives an even line that suits small icons. Use the same pen for the whole set so the line weight matches. A thicker pen is handy only if you want to bold the outer edge afterward.