Repeating Doodle Patterns: How to Fill a Page
Cover a page or a notebook cover with one even pattern using three layouts and a big-medium-small method: large motifs first, medium ones between, dots and tiny marks in the gaps.

Doodle at a glance
What you need
- Black fineliner or gel pen
- Pencil and eraser for spacing marks
- One highlighter or marker for an accent color
- Scrap paper to rest your hand on
A page covered edge to edge in small drawings looks like a lot of work, but it is mostly the same three or four doodles drawn again and again. Repeating doodle patterns are forgiving that way: no single motif has to be good, because the eye reads the whole surface at once.
What makes a filled page look even is the order you place things in. Below are three layouts to choose from and one simple method, big to medium to small, that works with all of them.
Pick a small set of motifs
A motif is one small drawing that gets repeated. Three or four of them is plenty. More than that and the page stops looking like a pattern and starts looking like a collection.
Choose them in three sizes:
- One large motif, roughly the size of a thumbnail. Example: a leaf drawn as a pointed oval with a line down the middle.
- One or two medium motifs, about half that size. Example: a five-point star, or a heart made from two bumps meeting in a point.
- Filler: dots, tiny circles, short dashes and small plus signs for the leftover gaps.
Add one accent color at most. A single highlighter or marker used on just one of the motifs gives the page a rhythm that a rainbow would flatten.
Three layouts: grid, brick and toss
The layout decides where each motif sits before you draw a single one.
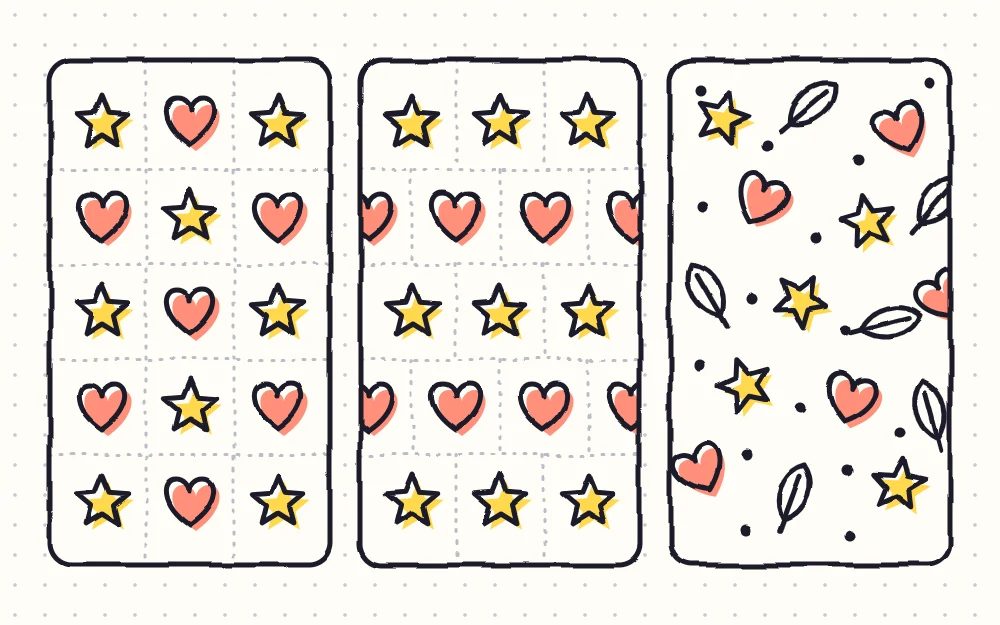
| Layout | How the motifs sit | The look |
|---|---|---|
| Grid repeat | In straight rows and columns, each motif directly under the one above | Neat and orderly, like tiles |
| Brick repeat | In rows, with every second row shifted sideways by half a step | Still tidy, but softer, like gift wrap |
| Scattered toss | Spread evenly with no rows, each motif turned to a different angle | Loose and casual, like confetti |
For a grid repeat, use squared or dot-grid paper and put one motif on every third or fourth intersection. For a brick repeat, do the same on the first row, then start the second row halfway between two motifs above. The brick repeat is also called a half-drop when the shift runs down the columns instead of across the rows.
The big-medium-small method
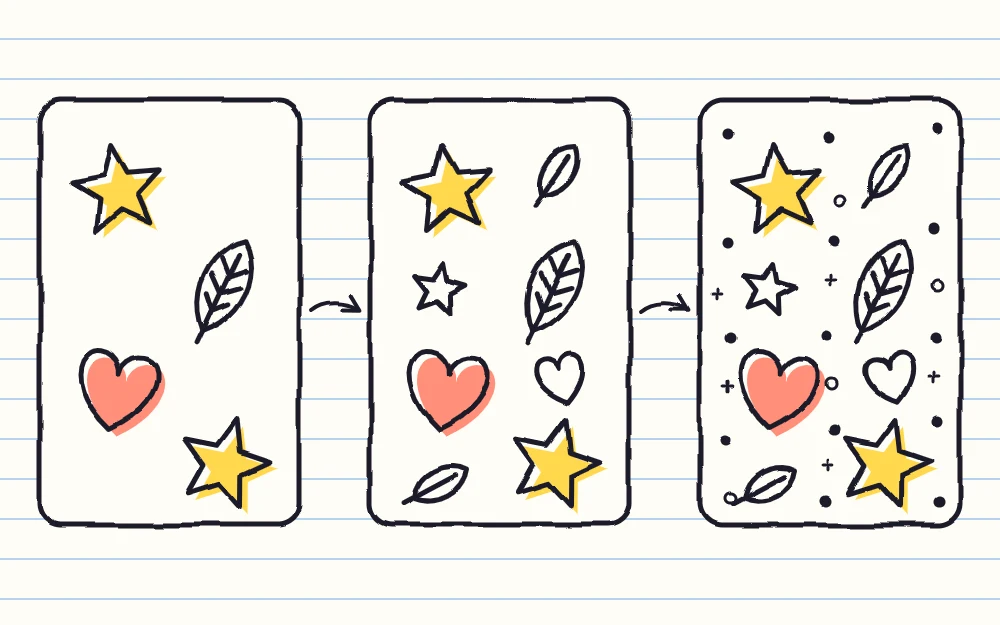
Filling a page from one corner to the other usually ends with motifs growing or shrinking as you go and a cramped last row. Working in three passes over the whole page avoids that.
- Place the large motifs. Draw your biggest motif across the entire page, leaving gaps about as wide as the motif itself. Glance at the whole page every few drawings to check the spacing looks even.
- Tuck in the medium motifs. Look for the widest empty spots and put one medium motif in the center of each. Do not let it touch its neighbors; a thin channel of blank paper around every drawing keeps the pattern readable.
- Fill the leftover gaps. Go over the page a third time with dots, tiny circles and short dashes. One to three marks per gap is enough.
- Stand back. Hold the page at arm’s length. Any pale patch that catches your eye gets one more dot or a small star.
Tip
If you are unsure about spacing, pencil a small circle wherever a large motif will go before inking any of them. Moving a pencil circle is easier than squeezing in a drawing later.
Rotate the motifs so nothing lines up
In a scattered toss, the giveaway of an uneven pattern is a row forming by accident. Three or four motifs pointing the same way in a line will pull the eye straight to them.
To prevent it, turn each motif before you draw it. A leaf points up, the next leans left, the one after that tips right or hangs upside down. Turning the notebook a quarter turn every few drawings does this automatically, with no planning.
Run the pattern off the edges
A pattern that stops short of the page edge looks like a group of drawings floating in a frame. One that runs off the edge looks like a piece cut from something larger, which is the effect you want.
To get it, let some motifs be cut by the edge: draw half a leaf at the left margin, the top two points of a star at the bottom. Aim for a partial motif every few fingers’ width along each side.
Watch out
On a full page your hand rests on finished work. Gel and felt-tip ink can smudge until dry, so slip a scrap of paper under your palm, and test markers on a back page first, since they can bleed through thin paper.
Theme ideas to try
Each set below lists a large motif, one or two medium ones and a filler, with a quick way to draw every piece.
- Leaves. Large: a pointed oval with a center line and three short veins on each side. Medium: a small round leaf on a short stem, and a sprig made from one line with four tiny ovals. Filler: single dots. Accent: green on the large leaves only.
- Stars. Large: a five-point star outline. Medium: a crescent, drawn as a C shape with a shallower curve closing the inside. Filler: four-stroke sparkles and dots. For more shapes to swap in, see these easy night sky doodles.
- Snacks. Large: a ring-shaped pastry, drawn as a circle with a small circle inside and a wavy line of icing between them. Medium: a cookie, which is a circle with five dots, and a wrapped candy, an oval with a small triangle on each end. Filler: short dashes for sprinkles.
Short on motifs? A long list of quick things to doodle is a handy place to pick three that go together.
Where a filled page works well
A full pattern suits the inside cover of a notebook, a title page for a new month, the back of an envelope, or a strip cut into bookmarks.
A full notebook page usually takes somewhere around twenty to thirty minutes, and it does not have to happen in one sitting. Because the method works in passes, you can stop after any pass and the page still looks finished enough to leave. For patterns built on strict rows and cells instead of loose motifs, the set of geometric designs made from lines and shapes is the place to go next.
Frequently asked questions
How many different doodles should a repeating pattern have?
Three or four motifs plus simple filler marks is the comfortable range. With fewer, the page can look sparse unless the motif is detailed. With more than four, the repeats sit too far apart for the eye to notice them, and the page reads as a mixed sheet of drawings instead of one pattern.
Why does my doodle pattern look uneven?
The usual causes are filling the page from one corner, which lets sizes and gaps drift, and letting motifs line up in accidental rows. Working in passes across the whole page fixes the first. Turning each motif to a new angle and keeping matching motifs apart fixes the second.
Can I use a repeating pattern on lined paper?
Yes. The ruled lines show through, so a brick repeat that follows them tends to look better than a scattered toss fighting against them. Place motifs on every second or third line and shift alternate rows sideways. Bolder outlines also help the pattern sit on top of the ruling.