Geometric Doodle Patterns: 10 Easy Designs From Lines and Shapes
Ten tidy patterns built from lines, dots and corners, with the stroke order for each, a honeycomb worked through in stages, and a simple way to split a page into sections and fill every one.
Doodle at a glance
What you need
- Fineliner or gel pen, around 0.3 to 0.5 mm
- Thicker pen for bold section lines
- Dot-grid or squared paper
- Pencil and eraser for guide lines
Straight lines, dots and a few corners are all it takes to fill a box, a letter outline or a whole section of a page. Geometric doodle patterns look tidy even when the lines wobble a little, because the repetition does most of the work.
Here are ten of them, each with the order to draw the strokes in. None needs a ruler. A steady rhythm and paper with a grid on it will get you most of the way.
Let the paper be your guide
Dot-grid and squared paper hand you free spacing. Every dot or square is a ready-made measure, so stripes stay parallel and checks stay square without any measuring. On blank paper, pencil a few light guide lines first and erase them when the ink is dry.
Two habits make every pattern here easier:
- Draw all the lines in one direction first. Finish every line that slants one way before starting the lines that cross them. Your hand settles into one motion and the spacing evens out.
- Alternate filled and empty cells. Coloring every other cell with ink or an accent color turns a plain grid into a pattern with contrast.
If long lines tend to drift, a minute of line warm-ups before you start helps the first rows come out cleaner.
Four patterns from straight lines
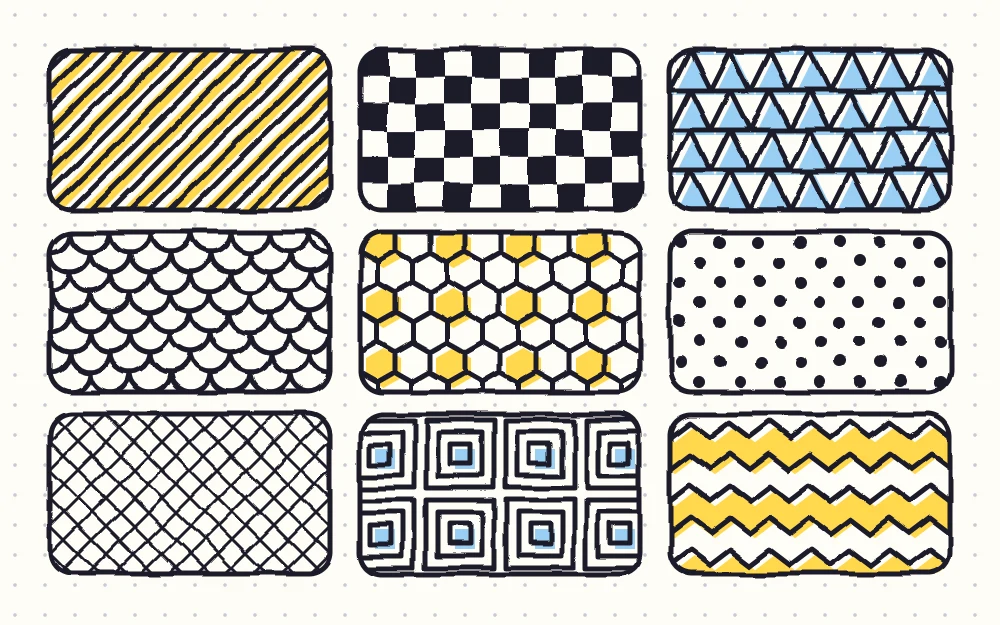
- Stripes. Draw parallel lines with equal gaps, all in the same direction. For variety, tilt them diagonally, or alternate one thick line with two thin ones.
- Checkerboard. Draw evenly spaced vertical lines, then horizontal lines at the same spacing to make squares. Fill in every other square, shifting by one square on each new row.
- Crosshatch. Draw a set of diagonal lines leaning right. Cross them with a second set leaning left at the same spacing, which leaves a mesh of small diamonds.
- Bricks. Draw horizontal lines first. In the top row, add short vertical lines to cut it into rectangles about twice as wide as they are tall. In the next row, place each vertical line under the middle of the brick above, and keep alternating.
Three patterns from points and corners
- Triangles. Draw two parallel horizontal lines. Zigzag between them from one end to the other, touching the top line, then the bottom line. Fill in the triangles that point down and leave the ones that point up empty.
- Chevrons. Draw one zigzag across the space. Draw a second zigzag just below it, copying every peak and valley, and keep stacking rows at the same distance.
- Concentric squares. Draw a small square. Draw a larger square around it with an even gap on all four sides, then another around that. Repeat the whole motif side by side to cover an area.
Three patterns from dots and curves
- Dot grid. Tap dots in a straight row with equal gaps. On the next row, place each dot under a gap in the row above. Press and lift for round dots; flicking the pen leaves tails.
- Scales. Draw a row of U shapes that touch at their top corners. Hang the next row from the first: each new U starts at the lowest point of one U above and ends at the lowest point of its neighbor.
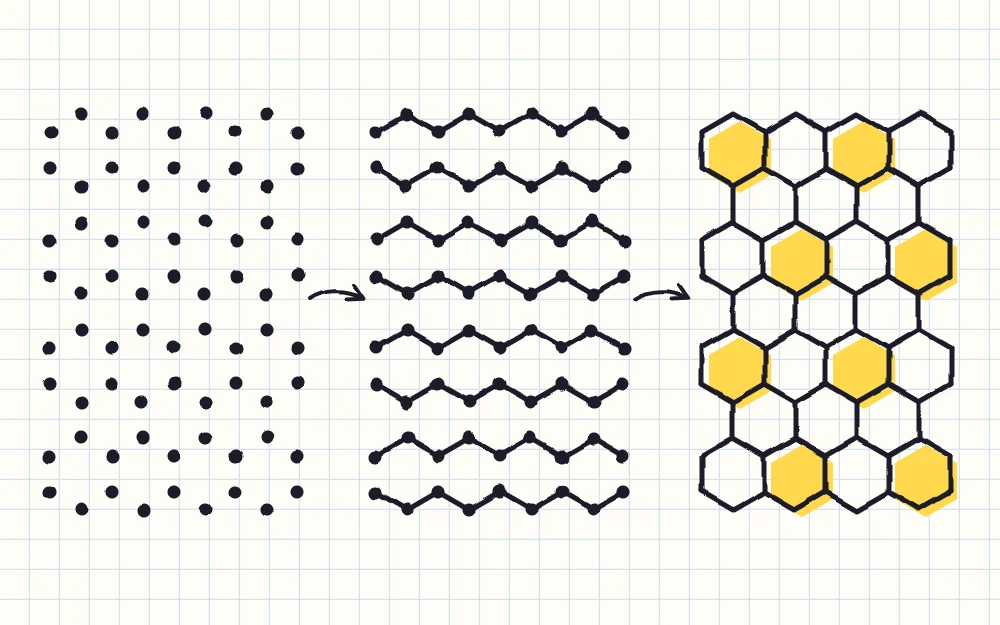
- Honeycomb. Rows of six-sided cells, built from zigzags and short vertical lines. The worked example below takes it one stage at a time.
Worked example: a honeycomb in three stages
Honeycomb looks like the hardest pattern in the set, but it is only two strokes repeated. Hexagons fit together with no gaps, which is why the pattern is a classic tessellation.
- Mark the dots. On dot-grid paper they are already there. On blank paper, pencil a small grid of dots with equal gaps, about six across and six down.
- Draw the first zigzag. Along the top two rows of dots, zigzag from left to right: up to a dot in the top row, down to the next dot in the second row, and so on.
- Draw a flipped zigzag. Move down one row of dots and draw a second zigzag that mirrors the first, so each of its high points sits directly below a low point of the zigzag above.
- Join the rows. Connect each low point of the upper zigzag to the high point beneath it with a short vertical line. The first row of hexagons appears.
- Repeat downward. The flipped zigzag is now the top of the next row. Move down one more row of dots, draw another zigzag flipped the other way, and join again.
- Fill every other cell. Color alternate hexagons with an accent color, or add a dot to the center of each empty one.
Which pattern fits which space
| Space to fill | Good choices |
|---|---|
| Thin strip or banner | Stripes, chevrons, triangles |
| Small box or label | Dot grid, crosshatch |
| Large section | Honeycomb, scales, bricks |
| Odd or curved shape | Dot grid, scales, stripes |
Narrow patterns such as chevrons and triangles also work as a single row around a page. The guide to easy page borders covers how to turn the corners.
Divide a page and give each section a pattern
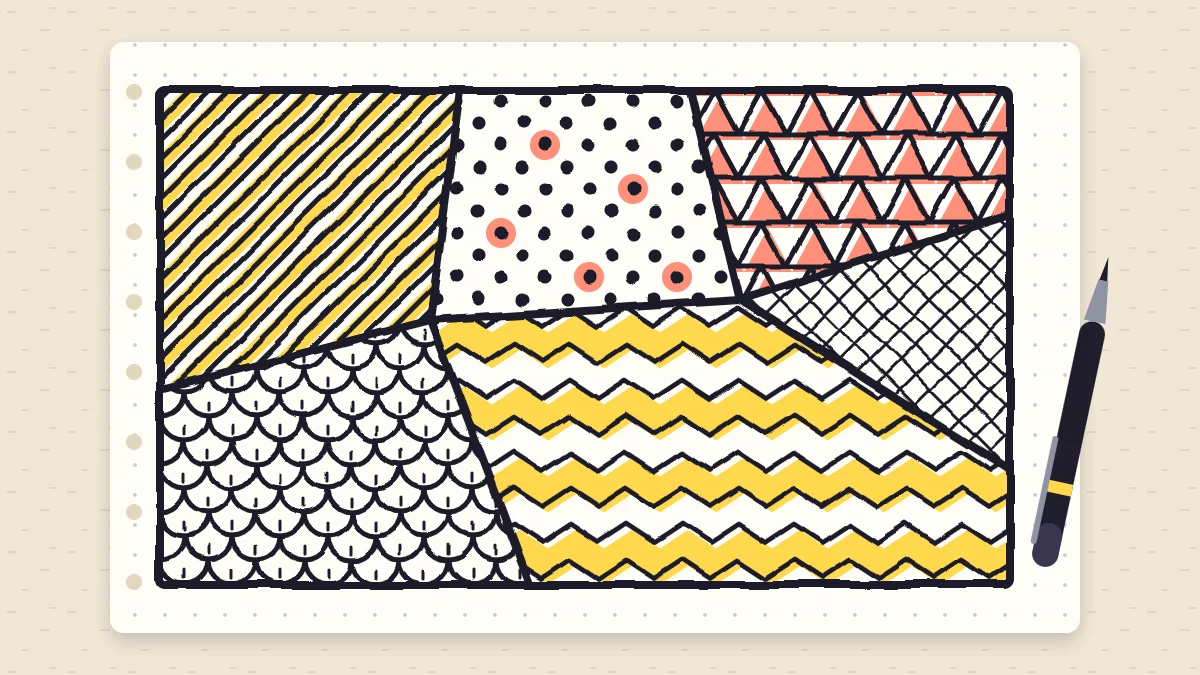
This uses the whole set at once and fills about ten to fifteen minutes.
- Draw a frame near the edges of the page with a thicker pen.
- Split the inside with four or five bold lines, straight or gently curved, running edge to edge. You should end up with six to ten uneven sections.
- Choose a pattern for the first section and fill it right up to the bold lines.
- Move to a neighboring section and pick a pattern that contrasts: fine dots beside wide stripes, curved scales beside angular chevrons.
- Leave one or two sections empty, or fill them solid, so the busy areas have somewhere to rest.
Tip
Change the scale as well as the pattern. The same checkerboard drawn with tiny squares in one section and large squares in another reads as two different textures.
Keeping patterns even
- If a row drifts, correct it over the next few rows a little at a time. A sudden fix shows more than the drift did.
- Wait for wet ink to dry before filling cells next to it, since gel and felt-tip ink can smudge.
These ten are all grid-based, so every cell lines up with its neighbors. For a looser look, with small motifs tossed across the page at different angles, see the guide to filling a page with a repeating pattern.
Frequently asked questions
Do I need a ruler for geometric patterns?
No. Freehand lines give doodle patterns their relaxed look, and small wobbles disappear once a shape is repeated many times. Dot-grid or squared paper keeps the spacing even without measuring. A ruler is only worth picking up for the bold lines that split a page into sections.
Which geometric pattern is the easiest to start with?
Stripes and the dot grid are the gentlest starting points because each uses a single repeated mark. Chevrons come next, since they are one zigzag copied row after row. Save honeycomb and scales for when your spacing feels steady, as both rely on each row lining up with the one above.
How do I stop a pattern from slanting as I go?
Check the newest row against the edge of the space, not against the row before it, because small errors pile up when each line copies the last. Turning the page so your hand always pulls strokes the same comfortable way also helps, as does working on paper with a visible grid.