Bird, Bee and Butterfly Doodles: Small Garden Creatures
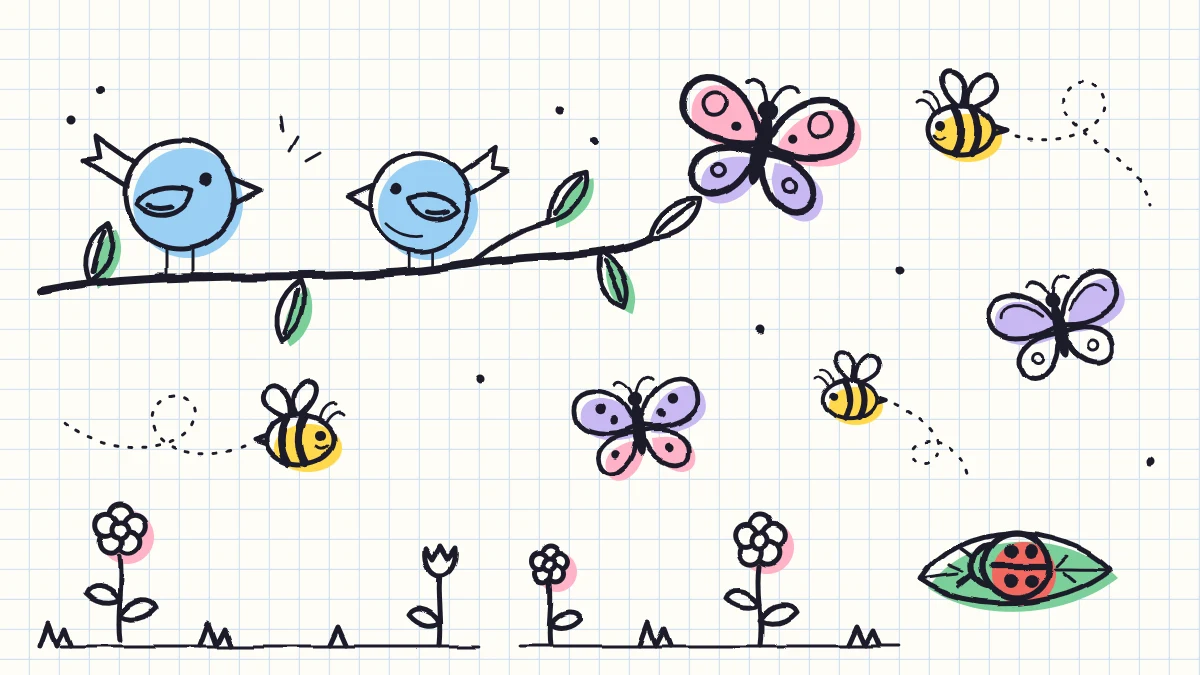
Draw a round bird, a striped bee with a dashed flight path and a four-wing butterfly, each from a circle, an oval or a single line, plus a ladybug, dragonfly, snail and caterpillar to tuck around your flower doodles.
Doodle at a glance
What you need
- Black fineliner or gel pen
- Pencil and eraser for guide lines
- Yellow highlighter or marker for an accent color
- Any notebook page
A page of flowers and leaves looks finished the moment something small flies across it. A bird on a stem, a bee with a looping trail, a pair of wings hovering over a petal: each takes under a minute and turns a row of plants into a little garden.
Below you will find round birds, striped bees and easy butterfly doodles, plus four quick extras for the ground level. Every one starts from a circle, an oval or a single line, so nothing here needs more than a pen and a spare corner of paper.
The round bird, stroke by stroke
This bird is basically a ball with a beak. Draw it about the size of a thumbnail and keep the lines loose.
- Draw a circle for the body. A slightly squashed circle is fine and often looks friendlier.
- Add a small sideways triangle on the left edge, about halfway up, for the beak. Put one dot for the eye just behind it, a little above the beak.
- Inside the body, on the right half, draw a curve shaped like a wide letter U lying on its side. That is the wing. On the right edge of the circle, add two or three short lines fanning outward for the tail.
- Drop two short straight lines from the bottom of the circle for legs. Finish each with three tiny strokes spread like a fork for the toes.
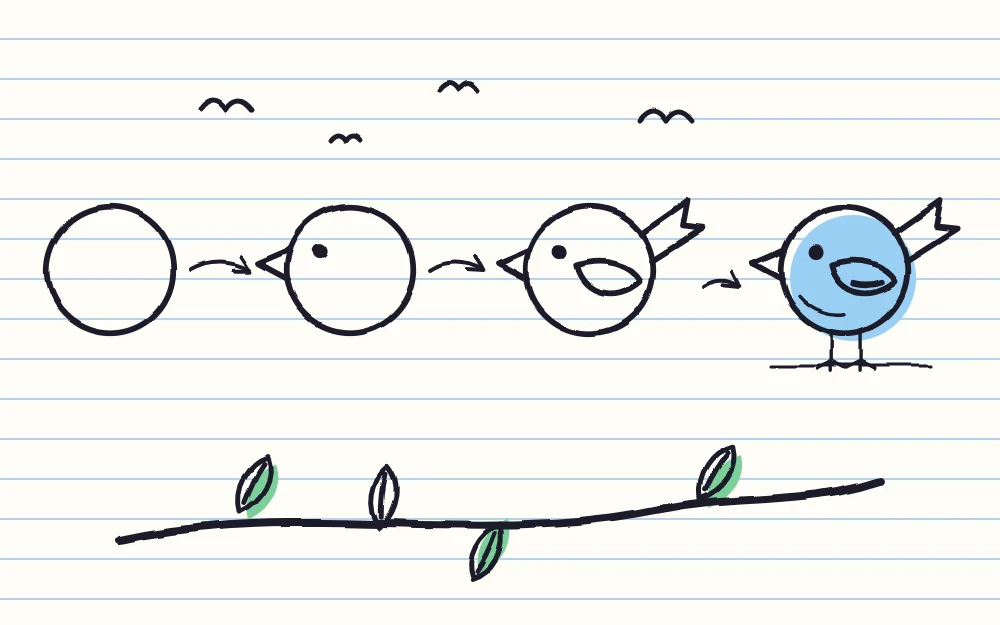
The beak and the fork feet do the recognizing. If your bird reads as a ball, make the beak a touch bigger before you change anything else.
Two more birds: perched and flying
Bird on a branch
Draw the branch first: one slightly wavy line with a short twig splitting off at one end. Then draw the round bird so the bottom of its circle sits just above the line. Skip the legs and draw only the toes, as three tiny strokes hooked over the branch.
Flying bird
For a bird far away in the sky, draw a soft V: start at the top left, curve down to a low point, then curve back up to the top right. Each side should bow upward like a shallow hill. Three of them at different sizes and tilts read as a little flock.
A bee and its flight path
Bees are the easiest creature here and the best filler for small gaps.
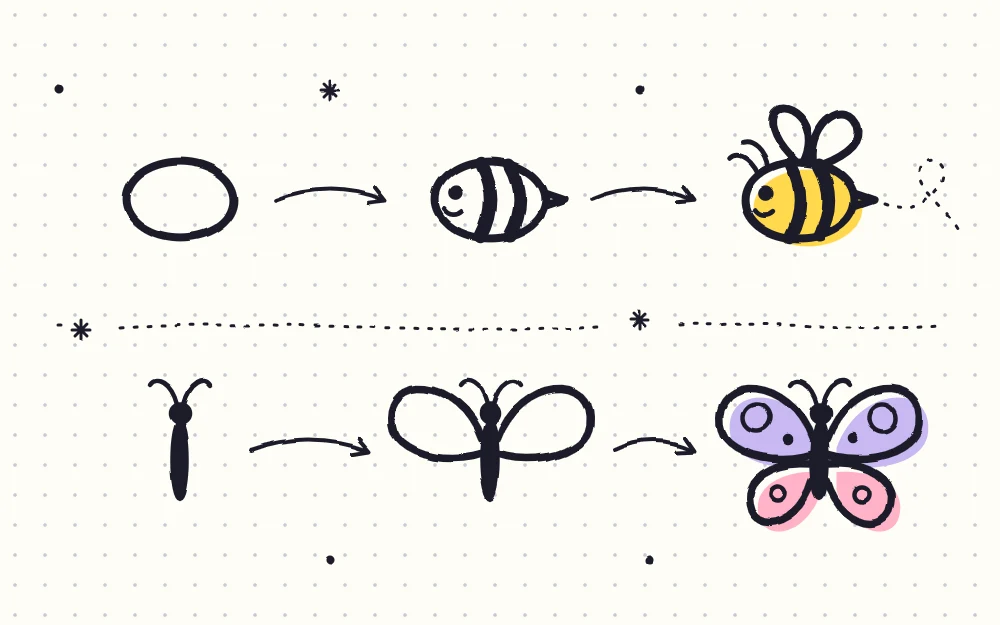
- Draw a small oval lying on its side, about the size of a grain of rice doubled.
- Add two or three curved stripes across it. Curve them the same way the oval’s end curves, so the body looks rounded. You can fill every other stripe solid with your pen.
- On top of the oval, draw two loops shaped like teardrops, meeting at a point where they touch the back. Tilt one left and one right.
- Put a dot eye near the front end, and a tiny point at the back end for the stinger if you like.
Now the detail that makes it look alive: a dashed flight path. Start at the bee’s tail, draw short dashes in a gentle curve, make one full loop like a cursive letter e, then carry on a little further.
Butterfly doodles from a single line
A butterfly is a short line with four wings hung on it. The trick is to treat the left side as a mirror of the right.
- Draw a short vertical line, or a very thin oval, for the body. Add two curved antennae at the top, each ending in a dot.
- From the upper half of the body, draw a large rounded wing on the right: go up and out, round the top corner, and come back in to the middle of the body. Repeat on the left.
- From the lower half, draw a smaller, rounder wing on each side, roughly half the size of the upper ones. Let them tuck slightly under the big wings.
- Add a pattern: one circle in each upper wing and one dot in each lower wing. Whatever you draw on one side, copy on the other.
Watch out
Wings rarely match perfectly, and that is fine. What does look odd is one upper wing sitting much higher than the other, so start both from the same point on the body.
Four quick extras for the ground
- Ladybug: draw a half circle like a dome, close it with a flat line, then add a smaller half circle on one end for the head. Draw a line down the middle of the dome and put two or three dots on each side.
- Dragonfly: draw a long thin body as a straight line with a small circle head on top. Add two long narrow loops on each side near the head, the upper pair a bit longer than the lower pair.
- Snail: start with a spiral for the shell, three turns from the center out. From the bottom of the spiral, draw a flat body that sticks out in front and rises into a rounded head with two short stalks.
- Caterpillar: draw five or six small circles in a row, each one overlapping the last, in a gentle hump. Add a face on the first circle and two tiny legs under each of the others.
If you want more creatures in the same rounded style, the collection of cute animals built from simple shapes uses the same blob-first approach.
Where to put them around flowers
These doodles earn their place as company for plants. Draw the plants first, using a few tiny flowers for margins and corners, then add creatures into the gaps.
- Put the butterfly above and to one side of a flower, tilted as if it is heading in to land.
- Give a bee a dashed path that starts at one flower and ends near another.
- Sit the ladybug on a leaf, the snail on the ground line, and the caterpillar on a stem.
- Keep birds at the edges: one on a branch reaching in from the side, a flock of soft V shapes in the top corner.
Vary the sizes: one larger butterfly, two bees and a small flock look more natural than five creatures of equal size.
Adding an accent color
One accent color is plenty: yellow on every other bee stripe, pink in the butterfly’s wing circles, or red on the ladybug’s dome. Let the pen lines dry for a minute first, since gel and felt-tip ink can smudge while wet.
For a whole page built around a garden scene, the spring and summer doodle ideas add kites, watering cans and other warm-weather things to draw beside them.
Frequently asked questions
How do I make both butterfly wings match?
Draw the body first, then work in pairs: right upper wing, left upper wing, then the two lower wings. Start each pair from the same point on the body. Small differences are fine and look hand-drawn; it is only a big difference in height that stands out.
What is the easiest flying creature to doodle?
The bee. It is one small oval, two or three curved stripes and two loop wings on top. Add a dashed line with a single loop behind it and it reads clearly even when drawn very small, which makes it a handy filler between flowers.
How small can I draw these garden doodles?
A bee or ladybug works at about the size of a pea, and a bird or butterfly at thumbnail size. At that scale, use a fine tip of around 0.3 to 0.5 mm and keep inside details to one or two marks so the lines do not run together.